

By Aria Brent,
AFRO Staff Writer
The ancient saying goes “you are what you eat.” Given the type and prevalence of health disparities in the Black community, the old adage couldn’t be more true.
This week, the AFRO’s special edition is focusing on self-care and tools you can use to improve your life and thrive– not just survive. Read below as we detail five, healthy recipes that will last throughout the week, while also nourishing the body with ingredients to nurture the mind, body and soul.
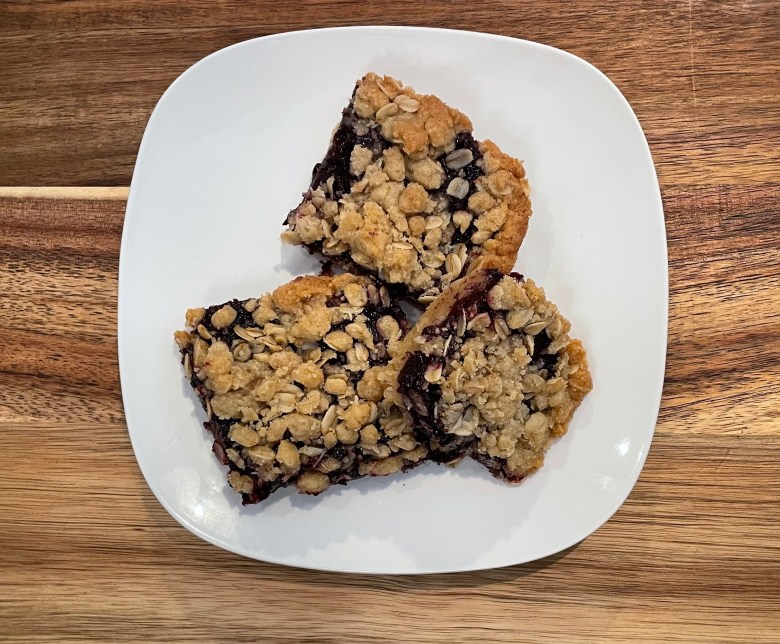
Blueberry Oatmeal Bars
Serving: One bar; Makes nine servings
Ingredients:
- 1 pint of blueberries
- 2 cups of flour
- 6 oz of melted butter
- 1 cup of light brown sugar
- 1 cup of rolled oats
- 3 tbsp of honey
- 1 tbsp of cinnamon
Instructions:
- Place your blueberries in a small saucepan and set to a medium to high temperature. As your berries begin to heat up, mash up your berries with a fork or a potato masher. Don’t mash them into a liquid, just break them into pieces.
- After mashing up your berries, add in your honey and cinnamon. Allow this to cook until it begins to thicken and boil. Be sure to stir your mixture often so that the mixture doesn’t burn or stick to the pot.
- After the berry mixture has thickened, remove it from the heat and allow it to cool. Once your mixture cools, it should be a jam or fruit preserve texture. This fruit filling can be made up to 3 days in advance and stored in the refrigerator for about a week.
- In a medium sized bowl, add in 1 ½ cups of flour, 4 oz of melted butter, and ½ a cup of light brown sugar. Mix the ingredients together until a soft dough is formed. Preheat your oven to 350°F and press your dough into the bottom of a greased 8×8 pan. Once your oven is at 350°F, put your pan into the oven and cook the dough for 12 minutes.
- As your dough is baking in the oven, mix together the rolled oats, remaining 2 oz of melted butter, ½ cup of light brown sugar and ½ cup of flour. Mix all ingredients together until everything is well combined and a crumbly texture.
- After you remove your dough from the oven, allow it to cool for about five minutes and then add your blueberry mixture on top of it.
- Top off your blueberry mixture with the oatmeal crumble and bake until browned on top.
- Allow your baked goods to cool for at least 15 minutes and then cut into squares.

Cheddar Turkey and Spinach Egg White Bites
Serving: Two Egg White Bites; Makes six servings
Ingredients:
- 16 oz of egg whites
- 8 oz of sharp cheddar cheese
- 1 ½ cups of diced oven roasted turkey
- ⅓ cup of heavy cream
- 10 oz of baby spinach
- Garlic powder
- Black pepper
Instructions
- Add your spinach to a small skillet set to a medium temperature with a small amount of olive oil. Mix around the spinach until it begins to wilt. As the spinach shrinks, water can be added to the pan to cook the spinach without burning it.
- Once your spinach is wilted, allow it to cool for about five minutes and set it aside without any residual liquid that might be left behind
- Combine your egg whites, and heavy cream and mix them until both ingredients are no longer separate. For seasoning, add in a tablespoon of garlic powder and black pepper for taste.
- After making your base for your egg whites, add in your cheese, diced turkey and spinach and mix everything together.
- Add your mixture to a greased muffin tin and fill each of the holes to the top. Be sure not to overfill them. To avoid any spills while they’re baking, place your filled muffin tins on top of a baking sheet.
- Place your egg white bites in the oven at 350°F for 30 minutes or until they’re brown on top and form in the middle.
- When you go to remove your bites from the muffin tin, use a butter knife to lift and remove them.
Egg white bites can be enjoyed within four days of cooking them, or they can be frozen for up to three months.

Greek Chicken Salad Wrap
Serving: 4 oz wrap; Makes seven servings
Ingredients :
- 1lb of cooked chicken
- 8 oz of diced celery and onions
- 6 oz of diced roasted red pepper
- 5 cloves of garlic
- ¼ cup of mayonnaise
- ¾ cup of nonfat greek yogurt
- 10 oz of feta cheese
- 1 tbsp of dried dill
- 2 oz of lemon juice
- black pepper
- 2 tbsp of Cavender’s all purpose Greek seasoning
Instructions :
- Place Greek yogurt, lemon juice, dill, and garlic cloves in a blender and blend until smooth. Once you’ve blended your sauce, add in your mayo and blend again until everything in your dressing is well combined.
- In a bowl, add in your chicken that is either pulled or diced. Add your diced onions and celery, along with your dressing and mix everything together.
- Following this add in your feta cheese, diced roasted red peppers and all purpose Greek seasoning. Add in black pepper for taste.
- Once the chicken salad is complete, allow it to chill in the fridge for about two (2) hours.
- When ready, add your chicken salad to your wrap of choice along with some shredded lettuce.
Roasted Sweet Potato and Black Bean Enchiladas
Serving: Two enchiladas; Makes five servings
Ingredients:
- Two (2) medium sized sweet potatoes
- 15 oz black beans
- 8 oz of green chiles
- 16 oz of white cheddar cheese
- Ground cumin
- Garlic powder
- Black pepper
- Kosher salt
- Lime juice
- Nonfat greek yogurt
- Flour tortillas
- Salsa verde
Instructions:
- Peel and dice your sweet potatoes into small cubes.
- Add your sweet potatoes to a large skillet with some vegetable oil and allow them to start cooking down. You want to cook your potatoes until they’re fork tender.
- Season your potatoes with 1 ½ tbsps of cumin, garlic powder, and black pepper. As your potatoes cook down, continuously add water to the pan to help them soften up.
- Once your potatoes are just about done, add in your black beans and green chiles
- Let your mixture simmer for about five (5) minutes or until all the liquid has cooked off of your filling.
- Add in half of your white cheddar cheese and a dollop of nonfat yogurt to your filling until it’s well combined and the cheese has melted.
- Fill your tortillas with your sweet potato and black bean mixture and roll them up.
- After rolling them up, add them into a pan and top them with a mixture of the salsa verde and greek yogurt.
- Top your enchiladas with your remaining cheddar cheese and bake at 375ºF for 25 minutes or until the cheese is browned and bubbly.

Roasted Rosemary and Garlic Green Beans
Serving: 20 green beans; Makes four servings
Ingredients:
- French cut green beans
- Minced garlic
- Fresh rosemary
- Lemon
- Sea salt
- Black pepper
- Olive oil
Instructions:
- Cut the end tips off your green beans.
- Lay your green beans flat on a baking sheet.
- Chop up rosemary into small pieces.
- In a bowl combine your mixed garlic, rosemary, black pepper and sea salt and mix together.
- Coat your green beans in olive oil and the majority of your blend of rosemary, and garlic. Mix your green beans around until they’re all evenly coated.
- Place your green beans in the oven at 350ºF for 30 minutes, until the green beans are tender.
- After 30 minutes, remove your green beans from the oven and move them around to assure they cook evenly. Sprinkle the last of your rosemary blend on your green beans along with a little bit of lemon juice.
- Put your green beans back in the oven for an additional 15 minutes to finish cooking.

Salmon Croquettes
Serving: One salmon croquette, Makes 12 servings
Ingredients
- 30 oz of canned salmon
- 10 oz of frozen mirepoix
- Lemon and Herb Old Bay
- Garlic powder
- Bread crumbs
- Fat-free mayonnaise
- Eggs
- All purpose flour
- Canola oil
Instructions:
- In a bowl, add in your canned salmon and remove any bones that might be in the fish.
- To your salmon, add a tablespoon and a half of the garlic powder and old bay seasoning.
- Mix together your fish until the seasonings are well combined.
- Add in your mirepoix vegetables, three (3) large eggs, two (2) tbsps of mayonnaise and one (1) cup of breadcrumbs.
- Combine all of your ingredients together until your salmon mixture is firm enough to form into patties that won’t break apart. If your mixture is too loose, add more breadcrumbs. If it’s too firm, add more mayonnaise.
- Form your salmon mixture into patties and then put them in the fridge for at least an hour after forming them.
- Once you’re ready to cook your salmon croquettes, remove them from the fridge and begin to coat them.
- First coat your salmon croquettes in all purpose flour, then place them in an egg-wash and then lastly coat them in breadcrumbs. Be sure that with each step your croquette is fully coated in the ingredients.
- Heat up a medium-sized skillet and add in enough oil to coat the bottom or the pan.
- Let your oil heat up to 325°F. You can make sure your oil is hot enough by using a kitchen thermometer.
- After your oil is hot enough, add your croquettes in and cook them in batches of three (3.)
- Let them cook for about 5 minutes on each side or until they’re browned and crispy on the outside. As you remove them from the oil, place them on a paper towel lined pan or a rack to catch any residual grease.
- After all of your croquettes are done cooking they’re ready to eat.
*Mix for your salmon croquettes can be kept for up to three days in the fridge before cooking them.
The post Healthy recipes, meals and snacks to feed the mind, body and soul appeared first on AFRO American Newspapers .


